Personal Disaster Recovery and Continuity

It is just my wife and I, no kids. I am the one that handles many of the household details. Read: pay the bills, etcetera. I was thinking, “what if anything happened to me? Would my wife know that I have a life insurance policy here or there?” Probably not. I decided to put something together to help her should something bad happen to me. Some may think it is a bit on the morbid side to think about death, but it’s something that happens. I just don’t want it to be harder on my wife, family, friends, than it needs to be.

I bought a USB drive. A pretty beefy one, 64gb capacity. I’m going to use it for a few other things, not just this little project. I then looked into Truecrypt. I’ve used it before. It’s an open source encryption tool that’s also easy to use. The information I’m going to store absolutely needs to be encrypted. It’s going to have some pretty sensitive data on it. I won’t go into detail about how to use Truecrypt, you can go to their website for that information. I created an encrypted section of the drive.

Once  the encrypted area was in place I created a text file that lists all the accounts she could possibly need. As I get bills I set them aside in order to grab the pertinent information from them. The text file includes account, policy and phone numbers for insurance, 401k, checking/savings, credit cards, bills, and other online accounts. It also lists usernames and passwords to some of those online resources.  At some point I’ll put my will there and maybe a video or two. As things change, I’ll update the text file as needed.

I have instructions for using truecrypt printed off (covering mac or windows) which I will put into an envelope. I’ll store the password separately from the instructions and the usb drive. I’ll eventually need to give the instructions, password and usb drive to entrusted individuals with very clear instructions. I am still contemplating how to do this. My fear is, what happens if the person I entrust has something happen to them? Or, they lose the stuff. That would be a problem. Maybe a law firm is in order.

My hope is that my wife won’t need to dig through papers for required information. I also want to prevent the discovery some time down the road, “oh, look at this! I found a life insurance policy of Sean’s”. It’s all in one place. The important stuff. A lot of the username & password info will allow her to forego any hassle verifying my death or her having to prove her relationship to me. She’ll be able to simply log in as me and take care of business.

Now remember, when I go, I want an Irish wake. There better be whiskey and song!

Update WordPress to 331

Man it has been some time since I updated the version of the site. You have to do that or expect to get spammed/hacked.

The tricky thing with my site is that I do everything via ssh and I lock down ftp except to one home directory.  Essentially I

  1. download the WordPress zip file to my local machine
  2. unzip
  3. upload to home directory via sftp
  4. export wordpress entries to xml, which gets me all my posts, comments, pages, and categories in case I hose everything
  5. then backup: themes, index.php, uploads, plugins
  6. cp -R the contents of the new ‘wordpress’ directory to the existing one
  7. jump to browser and go to /wp-admin/update.php
  8. message saying wordpress is updated, prompts me to update database
  9. update database
  10. done

I then delete my – themes, plugins, uploads, index.php directories and file since all looks good.

Now I’ll do the same method to update the plugins.

Yes, it’s a pain in the butt to do this all. Right. I could set it  all up so that I can run the auto feature of wordpress, but I don’t want to open it up – so I sacrifice.

CyanogenMod Update to HTC Incredible-HowTo


CyanogenMod has breached 1M users. At this time, that’s 1 out of 200 android users are using CyanogenMod.

So what exactly is CyanogenMod. From the website:

CyanogenMod is an aftermarket firmware for a number of cell phones based on the open-source Android operating system. It offers features not found in the official Android based firmwares of vendors of these cell phones.

Cool, right?

I have a HTC Droid Incredible. An older phone, but I like the form factor. I don’t like the big bricks out there nowadays. I don’t watch Netflix on my phone, so the screen size is just fine for me.

I decided to check out CyanogenMod. This is how I did it*.

  1. *Download Astro File Manager
  2. Once Astro is installed, back up all apps. I had done a factory reset so my apps were minimal. I also did not backup other things like images, texts, etc, which you can also do via Astro.
  3. Rooted my phone using UnRevokd method for my phone. I use OSX so it was VERY easy.
  4. Install ROM Manager
  5. Open ROM Manager and backup current rom

Then I followed instructions from CyanogenMod’s wiki page for my phone as folllows:


  1. Launch RomManager.
  2. Optional: Choose the first option in the app, Flash ClockworkMod Recovery to update to the latest version.

  3. Select the Download ROM option from the main menu in the ROM Manager.
  4. Select the CyanogenMod option, and then choose the latest version of CyanogenMod from the menu.
  5. Optional: When you select the latest version of CyanogenMod, check the Google Apps* option.

  6. Once the ROM is finished downloading, it asks if you would like to Backup Existing ROM and Wipe Data and Cache.
  7. If Superuser prompts for root permissions check to Remember and then Allow.
  8. The HTC Incredible will now reboot into the recovery, wipe data and cache, and then install CyanogenMod. When it’s finished installing it will reboot into CyanogenMod.

I could not get the download to come through ROM Manager due to the zip being corrupted.

I finally got the download to go via ROM Manager. It took me several times. Kept giving me timeout error or corrupted zip. I just didn’t let my phone dim or timeout, kept it up while the download took place. Something to consider. Otherwise go ‘Recovery’ route: http://wiki.cyanogenmod.com/wiki/HTC_Incredible:_Full_Update_Guide

At this point my phone rebooted, got the CyanogenMod splash screen but continued into a loop. It never got into the OS. I was posting updates on Google+ so a follower told me to check this: http://wiki.cyanogenmod.com/wiki/Troubleshooting (Thanks to Tony Love)

So I had to proceed with the following instructions found here and outlined as follows (i used ClockworkModRecovery):

  1. Pull the battery from the device.
  2. Boot into the custom recovery image. Refer to this article on more info on that.
  3. Download the latest version of CyanogenMod on the computer.
    Optional: Download the Google Apps for the device.
  4. Mount the device into USB storage mode:
    • ClockworkMod Recovery: select mounts and storage » mount USB storage
  5. Copy the CyanogenMod update.zip to the root of the SD card
  6. Unmount USB storage mode:
    • ClockworkMod Recovery: select Unmount
  7. Wipe userdata:
    • ClockworkMod Recovery: select wipe data/factory reset
  8. Flash CyanogenMod:
    • ClockworkMod Recovery: select install zip from sdcard » choose zip from sdcard and select the CyanogenMod update.zip
  9. Reboot the device and everything should be fine.


Of course there was a bad zip. So I had to redownload the file to my computer, rename it ‘update.zip’, transfer it to root of sd card on phone, and then repeat the instructions above. I eventually got it running!!

Confidence will prevail. As long as you have ClockworkModRecovery installed, you should always be able to revert to factory reset. YAY!

    *Disclaimer – take responsibility for your actions. While I outlined what I did, you have to make sure your backup is good and that making this change to CyanogenMod does contain some risk of bricking your phone. No guts, no glory, but don’t blame someone else.

    [ad#ad-1]

    Thank you Steve Jobs


    “Remembering that I’ll be dead soon is the most important tool I’ve ever encountered to help me make the big choices in life. Almost everything — all external expectations, all pride, all fear of embarrassment or failure — these things just fall away in the face of death, leaving only what is truly important. Remembering that you are going to die is the best way I know to avoid the trap of thinking you have something to lose. You are already naked. There is no reason not to follow your heart.” — Steve Jobs, at a Stanford University commencement ceremony in 2005.

    Steve Jobs 1995-2011

    DB Rake:Fail

    So I come to the part where I do

    ruby script/generate model Page

    part of the book. I realize that much has changed in 3 years in the Ruby on Rails world. I do what any newb does when they’re stuck, I turn to search.  The command is

    rails generate model Page

    and whah-lah. Output appears on the terminal screen that something has automagically taken place. It can make you giddy. I have to laugh at this stuff, pros will look at this reaction and laugh. I think it’s simply awesome.

    I move on and update the project/db/migrate/version_create_pages.rb file so that it has some info to insert as a record into my newly created table.

    Page.create(:title => "Find A Gamer Home",
    :permalink => "welcome-page",
    :body => "Welcome to Find A Gamer")

    in the self.up method. Save.

    Shoot over to command line…

    rake db:migrate

    Thinks for a second and nothing seems to happen. The command line has let me down. I try again. Same result. Huh. You’d think it would change right? Just typing in the same command nothing happens, same result, strange.

    Turn to search. Find some info on version numbers. Check database table, nothing new. I use

    rails generate migration

    don’t do that. It creates a blank migration.rb type file. Database does nothing. I end up deleting file.

    I then try

    rake db:migrate VERSION=<insert version number>

    from <version number>_create_pages.rb file. and….BAM! some promising output appears on screen saying

    create_table (:pages)

    and

    CreatePages:migrated

    The above syntax is not verbatim, but you get the idea. Oh, the create_table part, yeah, I ended up dropping my database table with a command I shouldn’t have used. Good times.

    Now, I thought rails db:migrate would do the trick without a version number, but I’ll go this route for now. Go with what works, right?

    Newb Tales with Rails – Using a Book

    Ok, beside the Pick Axe book or The Rails Way, I’m using Apresses Practical Rails:Social Networking Sites to start my project. It’s a bit dated, but should do the trick. It gives me, like they say, a practical application way to learn Rails. The Agile Web Development with Rails published by the folks at Pragmatic Programmers: http://pragprog.com/ is also a good book, but I’m not overly concerned with doing an ecommerce site right now, though I’ll probably tackle that was well just to do some more coding.

    Having said all this, the project I’m tackling in the aforementioned book is going to be tweaked a bit to do something I’d like to actually launch into production.  The gist of the project will be to learn rails AND do an application that will help the tabletop gaming community.  I’ll elaborate more on the tabletop gaming project as I proceed.

    Wish me luck!

    Newb Tales with Ruby on Rails – Set Up Woes

    I’m using Ubuntu 10.4 and have managed to get a rails environment up and running. It took some Googling and messing around, but it’s working now!

    So I started a new application:

    rails new <project name> -d=mysql

    That managed to setup my project files.

    Then I thought I’d get my webrick web server up and running

    rails server

    That didn’t work.  Try running bundle install says the terminal.

    bundle install
    This could take a while...

    That failed. So I found a spot where I had to do the following. Though I though I did this, I did it again. What’s the harm right?

    sudo apt-get install libmysql-ruby libmysqlclient-dev

    The I did

    gem install rails
    bundle install
    gem install mysql

    With all this, I then did

    rails server

    and whalah, I go to localhost:3000 and it works. Finally. Though I may have performed some redundant steps, I’m ready to go now. Live and learn.

    Howto Setup VPS Web Server I

    Continuing from my previous post.

    This is part 1 of the series.

    Giving credit where credit is due, much of the info was found using Linode’s knowledge base.  We are assuming you have set up an account with your VPS, we’ll be using Linode info as a reference since that’s what I’m using. The next step is to deploy your linux distribution.

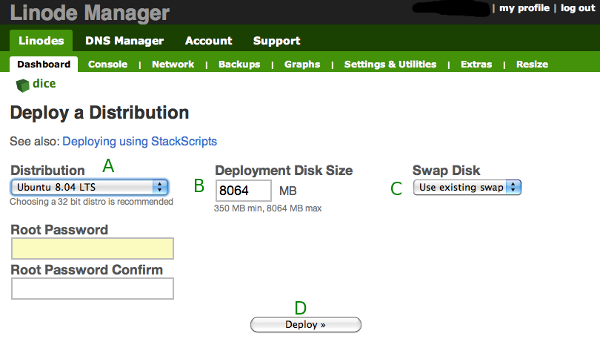
    1. Choose & Deploy Your Linux Distribution – see figure 6.3.1

    • Pick a distribution from the ‘Distribution’ drop down menu – A – We initially chose Ubuntu 8.04 LTS but later updated to 10.04 LTS
    • Enter ‘Deployment Disk Size’ – B – This is the amount of hard disk space you want to allocate to your virtual server. Looking back, I’d use it all. However, I chose to use half the space ( 8064)for a live server and hoped to use the other half for back up/redundancy.
    • Choose ‘Swap Disk’ – C – I used 256, middle of the road.
    • Enter your root password and confirm it.
    • Hit ‘Deploy’ – D – to make it happen.

    2. Boot

    The next step is to boot your machine. Ah, the excitement, right?  You will see a que that refreshes every few seconds informing you the status progress of the boot up process. Figure 6.3.2 is a screen shot of the area this would be depicted.

    VPS Status Que
    fig. 6.3.2

    The above screen shot, fig. 6.3.2, shows success after your VPS has successfully booted. Rock on!

    This is a short article. You now have Linux running on your VPS. The next step will be to login via SSH, secure SSH, fetch and apply updates to the operating system, and set the host name.

    How to Set Up Your Own Website Using VPS-Initial

    As I mentioned in a previous article, I recently ditched shared web hosting and secured a virtual private server (VPS) account. I shopped around, as I encourage you to do, and chose Linode. The reason? They were reasonably cost, my co-worker recommended them and has been impressed with their service, and they have a very good knowledge base. I have yet to use their support, but I have heard their support is good as well. With setting up a VPS, support may be key. Whether it’s good documentation, a great user base, or tech support, being on your own can be a little scary, so make sure you get some feedback from trusted resources.

    Logistics

    Setting up an account with Linode was easy. I didn’t have huge needs so I went with their base package. At the time of this writing it consisted of paying $19.99 with a 10% discount per month for signing up for a year. My package has the following specs:

    • 360 MB RAM
    • 16 GB Storage
    • 200 GB transfer

    I am going to set up sites for blogging and a low volume forum. So I’m not doing anything overly intensive. I can always upgrade if that’s the case.  Right now I have used 1GB of the 200.

    After setting up my account with Linode, I had to choose a datacenter where my VPS would be located. I chose Dallas. Literally, New Jersey and Dallas locations were within a hundred miles difference to me, and Dallas is in the same time zone. I went with Dallas. You have to make sure there is one available in your location preference.  Apparently some locations may fill up and hosting in that datacenter may not be an option.

    After giving them your credit card info and choosing a location for your servers home base, it’s time to consider your future set up. I got a site up and running only to start over again. Not a big deal unless you have a site that you’ve been updating for a couple weeks.  What I’m saying is, if you’re not overly invested in time, you can always nuke the server and start over no problem.

    In this series of articles it’s important to know my specific situation because I am merely relaying my experiences to you; therefore, your situation and setup may be different and I can’t guarantee that all this will be as easy as it was for me. Continue reading How to Set Up Your Own Website Using VPS-Initial