Continuing from my previous post.
This is part 1 of the series.
Giving credit where credit is due, much of the info was found using Linode’s knowledge base. We are assuming you have set up an account with your VPS, we’ll be using Linode info as a reference since that’s what I’m using. The next step is to deploy your linux distribution.
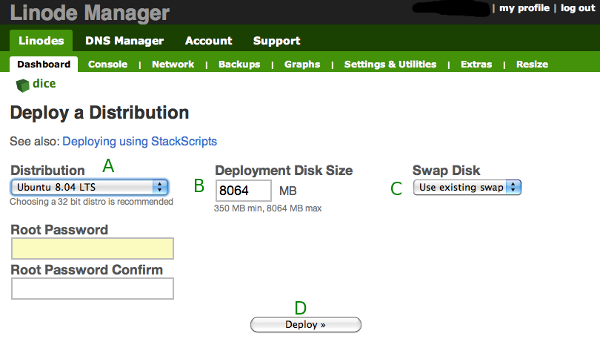
1. Choose & Deploy Your Linux Distribution – see figure 6.3.1
- Pick a distribution from the ‘Distribution’ drop down menu – A – We initially chose Ubuntu 8.04 LTS but later updated to 10.04 LTS
- Enter ‘Deployment Disk Size’ – B – This is the amount of hard disk space you want to allocate to your virtual server. Looking back, I’d use it all. However, I chose to use half the space ( 8064)for a live server and hoped to use the other half for back up/redundancy.
- Choose ‘Swap Disk’ – C – I used 256, middle of the road.
- Enter your root password and confirm it.
- Hit ‘Deploy’ – D – to make it happen.
2. Boot
The next step is to boot your machine. Ah, the excitement, right? You will see a que that refreshes every few seconds informing you the status progress of the boot up process. Figure 6.3.2 is a screen shot of the area this would be depicted.

The above screen shot, fig. 6.3.2, shows success after your VPS has successfully booted. Rock on!
This is a short article. You now have Linux running on your VPS. The next step will be to login via SSH, secure SSH, fetch and apply updates to the operating system, and set the host name.
